
Revised September 2022
By Asphalt Roofing Manufacturers Association (ARMA)
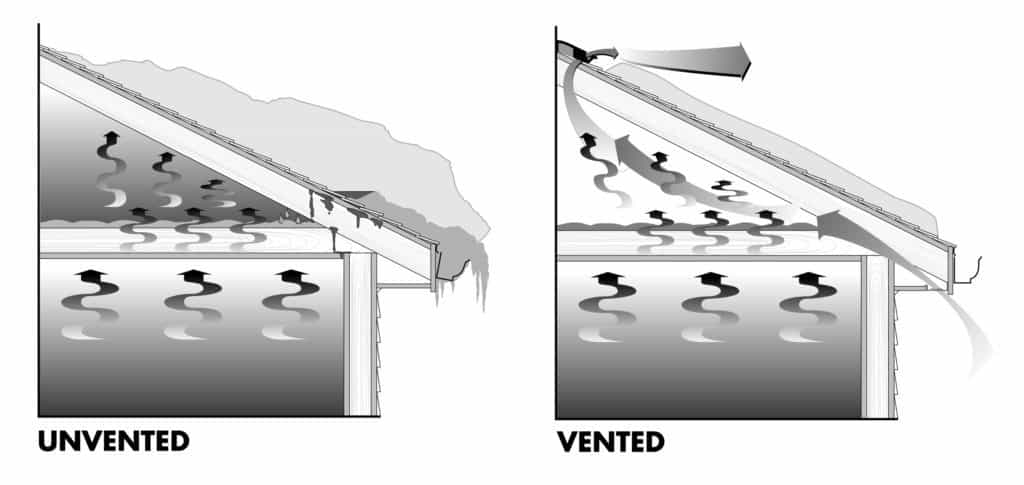
Image provided by CertainTeed Corporation.
Does Your Home Have a Properly Functioning Attic Ventilation System?
Every home has a roof, but is every roof properly ventilated to prevent premature roof deterioration or roofing system failure? While current building codes use specific design criteria to reduce the likelihood of moisture problems in unvented attic systems, the most common and time-tested approach is to provide proper ventilation under the roof assembly. Proper attic ventilation is a balanced system of intake and exhaust that allows a continuous flow of air. It not only helps to reduce heat and moisture buildup year-round but it can prolong the life of the building materials. Attic ventilation combined with properly installed insulation can assist with the longevity and performance of a roofing system by helping to prevent ice dams, aiding in reducing energy consumption, and keeping attic temperatures cooler in the summer and the space drier in the winter.
According to the Asphalt Roofing Manufacturers Association (ARMA), the best attic ventilation system allows natural air movement and includes a balance between intake and exhaust, as well as attic insulation that does not obstruct airflow. There are different system choices for both intake and exhaust.
The Creation of Natural Air Movement:
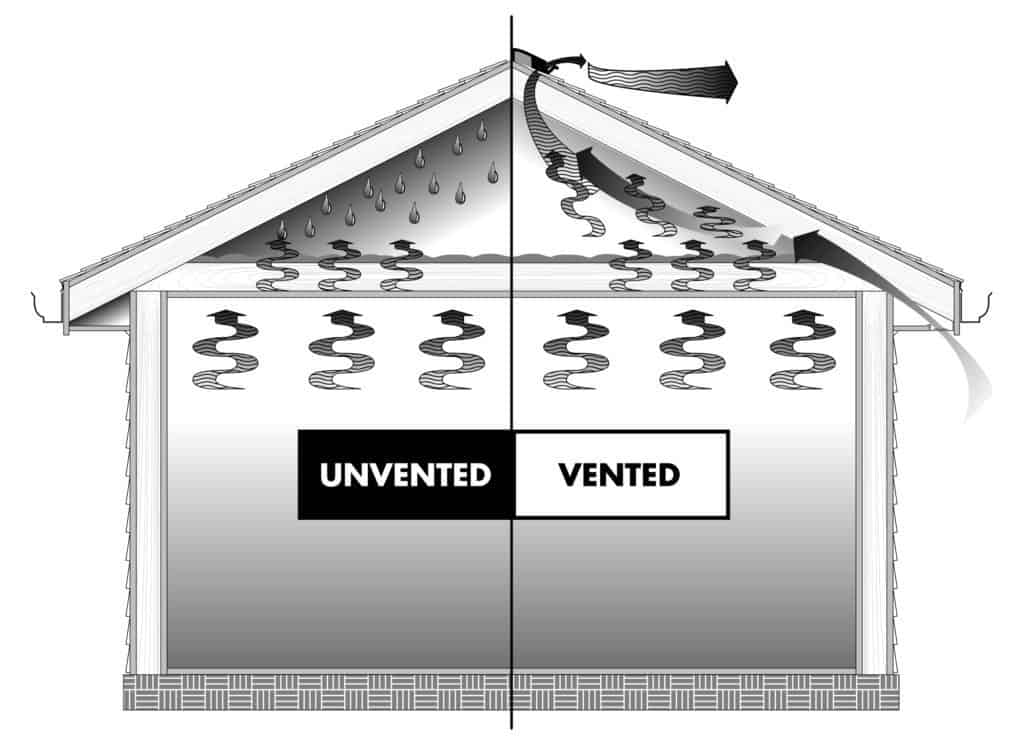
Image provided by CertainTeed Corporation.
Vent Installation
For an attic ventilation system to function most effectively, unobstructed intake and exhaust points allowing a natural flow of air must be installed. Natural air flow is created by installing intake vents at the eaves, soffit or lower portion of the roof or attic space and by installing exhaust vents at the ridge or upper portion of the roof or attic space. These vents should never be blocked or covered so that air can enter and exit freely.
As a general rule, combining different types of exhaust vents on a roof above a common attic space should be avoided (example: a ridge vent in conjunction with a roof fan). Doing so can result in ventilation “short circuit,” wherein an exhaust vent pulls air from another exhaust vent instead of pulling from intake vents. To increase the effectiveness of a passive attic ventilation system, an appropriate method is to increase air intake rather than exhaust.
The Stack Effect
Installing intake and exhaust vents allows the process known as the stack effect to assist the movement of air in an attic. Heated air is lighter than cold air and increases pressure in the upper parts of an attic while decreasing pressure in the lower parts. Heated air rises due to the pressure difference and exits the attic through exhaust vents placed near or at the ridge of the attic. Intake vents placed at the eaves, soffit or lower portion of the attic or roof allow air to naturally enter the attic due to the pressure difference.
The Wind Effect
Proper installation of intake and exhaust vents is important for creating a flow of air due in part to the wind effect. As wind-driven air is pushed against a building’s exterior surface, areas of high and low pressure are created. Areas of high pressure force air into the attic through intake vents such as eaves and soffit vents, while areas of low pressure pull air out of exhaust vents, such as a ridge vent. Installing intake and exhaust vents at the previous specified locations allows the air to be pushed into the attic as well as pulled out of the attic.
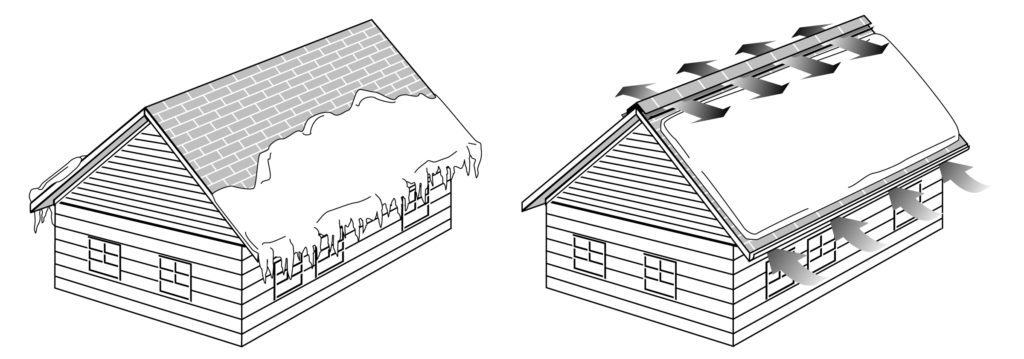
Image provided by CertainTeed Corporation.
A Balance Between Intake and Exhaust Installation:
While installation of intake and exhaust vents is critical to creating a flow of air, it is equally important to create the recommended balance between intake and exhaust.
The minimum amount of net free area required for ventilation is 1 square foot for every 150 square feet of area of the space ventilated, as directed by the International Building Code (IBC). Net free area is the actual open area for the passage of air within a vent. The IBC permits a reduction of the minimum net free ventilation area to 1/300 of the vented space provided both of the following conditions are met, as quoted from the 2021 International Building Code:
1. In Climate Zones 6, 7 and 8, a Class I or II vapor retarder is installed on the warm-in-winter side of the ceiling.
2. Not less than 40 percent and not more than 50 percent of the required ventilating area is provided by ventilators located in the upper portion of the attic or rafter space. Upper ventilators shall be located not more than 3 feet (914 mm) below the ridge or highest point of the space, measured vertically, with the balance of the ventilation provided by eave or cornice vents. Where the location of wall or roof framing members conflicts with the installation of upper ventilators, installation more than 3 feet (914 mm) below the ridge or highest point of the space shall be permitted.
Without a continuous flow of air, water vapor cannot exit the attic. Trapped water vapor can lead to wood rot, mold, mildew and wet insulation. Additionally, trapped warm air may melt any snow on the roof in cold climates. The melted snow can trickle down to the gutter and eave where it can refreeze, creating an ice dam. This can cause leaking or damage to shingles, gutters, insulation or the roof.
Check with the manufacturer of your roofing system to determine how well your attic is ventilated. To learn more, visit www.asphaltroofing.org.
